Vector pull to assist landing
Picture the situation where a swimmer (or boat) is roughly 50' away from you and 90° to your location. You can easily pull the object towards you. OK, now the boat has traveled an arc downstream to a 30° angle to the shore and you are fighting to get it over an eddy line. It is far more difficult to land that person or boat. Vectoring is a way to increase the pulling angle back towards 90°. One method is to have a second person on shore walk down the line while holding to bend the rope in the middle. As they get further down the line, the angle increases substantially. You can increase the angle yourself by walking backwards, further up on land if there is room. One problem with doing this yourself is potentially losing that great bracing/belaying position. The following short video demonstrates a snag plate and a vector pull: Vector Pull.
Coiling and rethrowing
Sometimes you miss on the first try, now what? Re-stuffing a throw bag takes time, time you typically don't have. For a really fast second throw, step on the end of the rope, quickly pull the rope and assemble in a pile at your feet. When you get close to the end, make several large coils in your throwing hand and toss with this extra weight. This technique is simple and surprisingly fast. Another variation of the same technique is scooping up water in the throw bag after you have gathered the rope in the same way. The water in the bag provides plenty of weight for an underhand throw. Here is an alternate technique: Throwing a coiled rope.
Belay techniques
 Besides locating firm footing, a rescuer on a throw rope still needs to handle pretty significant loads while bringing the swimmer on the end of the line to shore. Pulling with just your arms is often a losing battle, you need to use much larger muscles like your legs. Mountaineers and climbers use various belay techniques to transfers the load to their legs and use their body weight as well. When setting up a belay, always think about how you can quickly escape if necessary. A belay on the end of a rope whether standing or sitting runs the rope behind you just below the top of your hips. To escape, simply drop the rope. Unlike climbers we really don't have a belay device - we are using our body as the friction/belay device. We still need to follow the same rules though, never let go of the brake hand. The brake hand for us is the non-load bearing end of the rope (the one without the swimmer). We "brake" by bringing the brake end of rope in front of us and between our legs (maximizes friction). When you are in the brake position, you can slide your brake hand closer to your body to take up the slack.
 Belay Types
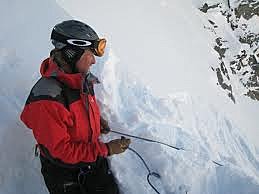
Standing Hip Belay Example of a standing hip belay, rope should cross the top of your butt.
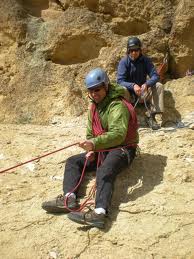 Sitting Hip Belay Example of a sitting hip belay. The person behind him provides additional and safe anchoring support. You can use a tree as an anchor instead if you are wearing a rescue vest (quick release buckle). Here is a video of this technique: Belay using a tree anchor.
You can assist a belayer by pressing down on their shoulders or pulling down on their PFD. Try not to pull back on them which can cause the feet to slide outwards. Think of it as hammering a nail into wood - perpendicular works best. This technique is called the Buddy Belay.
In a dynamic belay, instead of holding the line in a fixed position you can gradually pay out line or move down the shoreline. This reduces the shock load, sometimes helpful and in some cases enables you to land the swimmer in a safer landing zone. Just be careful with your footing when applying this technique.
If you need to belay from the middle of a line, don't wrap the line around your body. Once again, think fast escape. Bend the rope and use the bend for your brake hand. If you need a quick escape, drop the bent line. This technique is known as a belay on a bight.
You can also use a tree or boulder to handle the load instead of your back - sweet! Simply bend the rope around the immovable object and let friction handle the load. Your body's weight becomes the braking system.
Line on downstream side
One other belaying tip, always place the load bearing line on the downstream side of your body. This method makes braking easier and enables a much faster escape when dropping the line under load.
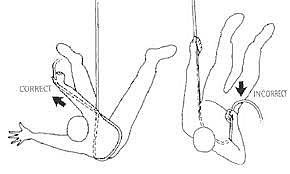
Receiving the rope
Once you catch the rope, flip on your back - head facing the sky and tuck the free end of the rope over the shoulder opposite to the rescuer. This establishes an automatic ferrying position. You can use the top part of your arm to add a bit of friction if necessary. Hold on with both hands and pay close attention to anything the rescuer tells you to do. Keep your elbows tucked in on top of your belly, loose elbows can get banged up on rocks. Remember your defensive swimming skills, keep your feet on the surface of the water to bounce off any obstructions downstream. Avoid grabbing the throw bag or end of the line, you want to be in the middle of the rope. Never place your hand inside the end loop (I would avoid even placing fingers there as well). This is why we retie the ends with small knots to avoid such temptation. Don't wrap the rope around your hand either as it makes it harder to let go quickly and you may accidentally pull your shoulder out of joint.
Page 2 of 4
- You are here:
-
Home

- Throw Ropes Training Material