Minimalist First Aid Kit
From a Paramedic’s Point of View – Swimmer
This is from a posting on Paddle Praddle from a very seasoned boater and paramedic. It was in response to a recommended minimalist first aid kit that is inexpensive and minimizes items that need to be monitored for expiration.
- Take a class. River side isn't the place to be flipping through pages trying to remember stuff. Pack your brain... it's portable, readily accessible, and very user friendly.
- Ace bandage. They are used to hold on dressings to control bleeding, hold on dressings that can cover an eye, don't require tape to hold together. Can be used to make splints and if things go really sideways they can be used to lash together shelter building material (simple lean to).
- A couple of kotex pads. Aka: sanitary napkin. They are designed to hold blood and do the job well. They are cheap, sanitary, and have a sticky back that will stick to the Ace bandage to help prevent it from slipping out of place. Keep in mind that hopefully your victim will be mobile and will require evacuation from the river so body movement will try to dislodge the bandage. Two should be enough if used in conjunction with direct pressure.
- A few 4x4's. They make them out of plain gauze which is almost like cheese cloth, and they make them with an absorbent material sandwiched between the layers. I prefer the plain gauze myself because it packs smaller and can be unfolded, re-tooled into other uses such as ties for a splint. 4x4's also make excellent eye patches, can be used to scrub clean wounds, and packed into gaping wounds.
- Liquid iodine. Assuming your patient doesn't have an allergy to shellfish or iodine, you can drip some into the wound to help slow down infection. You can also add it to water to disinfect for drinking or wound irrigation. The bottles are small, light weight, but do expire.
- A couple of triangular bandages. Sling / swath for bummed shoulders, eye bandages, head dressings, make shelter, shred for fire kindling.
- 800 mg Motrin... check allergies before giving but it helps with soft tissue injuries, orthopedic injuries, and fever. OTC doses are 200 mg tablet... can give 600 mg every six hours, 800 mg every 8 hours… no more than 2400 mg in 24 hours. It's processed by the kidneys so keep that in mind if pt is severely dehydrated, suffered great blood loss, or has renal issues.
- Benadryl for allergic reactions. If you mix the Benadryl with some Prilosec (the OTC upset tummy medication) you increase the histamine blocking action and can be more effective. But this is riverside survival medicine. You wanted simple and cheap...Benadryl. 50 mg by mouth. may make them sleepy but I am betting the adrenaline of being in the boonies, taking meds from a dry bag while looking at a few hours of evacuation time will keep them awake and alert.
- Small light source...led lights running on AAA battery. They make some really good ones. I prefer Black Diamond gear but that's just one suggestion.
- Food source... Gu, Cliff Bar, Power Bar (damn tough in the cold though). Can also go with a Snicker's bar, something like that. High carbohydrates with some protein thrown in. Helps stave off hypothermia by giving the body energy to burn and make heat. Eating also forces someone to slow down, take a break, gather their thoughts, thus stopping a headlong plunge down Panic Lane. Before you feed someone, make sure they aren't going to puke it back up. We usually don't feed head injuries because as their condition worsens they may lose their ability to control their gag, end up puking, then choking on their puke. Aspiration pneumonia is not a nice condition.
- I wrap my water bottle in duct tape. With that tape I can splint ankles, fingers, use the tape to hold on bigger splints. Can be split down lengthwise, made into ties to help build a hasty shelter. It can hold on bandages and be used to blaze a trail to mark your passage for SAR trackers or to help you re trace your steps.
- Spark... flint / steel at the bare minimum. I carry a flint/steel, a Bic lighter, and "strike anywhere" matches dipped in paraffin for waterproofing. Practice with it. Building a fire in wet conditions suck. It's hard, rarely truly successful except on TV. I make a mix of melted paraffin (found in grocery stores in the canning section) and pencil sharpener shavings, maybe toss in some lint from the dryer vent. Melt it all together, and then pour it into cardboard egg carton. Makes a dozen fire starters. These things burn even when damp and burn by themselves for several minutes, giving damp tinder a chance to dry and get a wood fire burning. A little bulky but worth it. I usually carry two. They don't expire.
- Knife. 3 inch blade minimum. Don't have to be Rambo, but it doesn't matter if you have the world's best first aid supplies, if you can't get a hurt patient through a cold night at the bottom of the Cheat Canyon, you haven't done anything. Other words… stopping bleeding is only one issue. Environmental survival is just as important. You need to be able to cut tree boughs to makeshift ground insulation, whittle kindling, make a shelter, cut bandages, clothing, duct tape. If it's got a shiny blade, then you have one more signal device to help catch rescuer attentions.
- Space blanket. I've used one at night while dressed in a dry suit, temps got to 38°. It sucked. Too lightweight to really wrap around yourself but I am pretty certain that if I had someone to tuck it all under me, it would be much more effective. Lightweight, cheap. I personally carry a bivy sack made from similar material, a little thicker. But you wanted small, lightweight, and cheap. The bivy sack is about the size if a grapefruit.
- Poor man's bivy of 45 gallon contractor trash bags. 3mm tough black plastic. Can punch a hole in the bottom for your head, make a poncho, and help keep you warmer. Can carry brush for firewood, can be split down two sides and made into a tarp, ground cloth, whatever.
The things I have described can be crammed into a Nalgene bottle or small dry bag.
I know my spelling, grammar, punctuation is poor but I've been up all night. if you have other questions, drop me an email or a note here.
Steve
First Aid Kit Items
Introduction
The following article was developed by Rick Aiken.
This document lists a number of items you may want to consider including in a customized first aid kit.
- BENADRIL
- ASPIRIN
- TUBE of CAKE ICEING
- GATORADE
- Anti-Diherral Pills
- Medicain Swabs
- Ibuprophin
- ABSORBANT PADS
- Cravats
- Vet Wrap
- TAPE (2 dissimilar types)
- Elastic Wrap
- Paper Towels
- Alcohol Wipes
- Gauze Pads
- Several Sizes of Adhesive Bandages
- Bivy Sack
- TRAUMA BLANKET w/ MYLAR BAG
- METAL CUP
- MATCHES
- Fire Starter
- LIQUIDS
- FOOD
- Spare Polypropylene Clothes
- Large Plastic Bag
- Tweezers
- Razor Blades
- Q-tips
- Splints
- Lighter / Matches
- Para-med Scissors
- Sewing Needles
- Heavy Duty Thread
- Leatherman Tool
- Very Small Flashlight
Some Food For Thought
Everybody ought to carry something so that nobody has to carry everything (which they won’t do).
“I’ve got the spare paddle, I assume that you have the bandages.” is the way it ought to be.
Every pound that you add to your boat makes it more likely that you will have a problem.
Try to carry something dissimilar from what the crowd carries.
Food and Liquid are a part of your first aid kit. Carry some on every trip, even when you do not plan to stop for lunch, and especially in cold weather.
Emergency Bivy Sack--Very Light for what it does.
Trauma Blanket—Doubles as Flotation and can be a real life saver in combo with a Mylar Bag.
Flotation Bags + Tape = Splints
Saw + Throw Rope + Mylar Bag + Trees = Splints or Stretcher, or Shelter
Needle & Thread + Tape = Spray Skirt or Dry Suit Repairs
Aluminum Splint + Tape = Paddle Shaft Repair (maybe)
First Aid Kit Rational
Introduction
The following article was developed by Rick Aiken.
A good first aid kit is LIGHT and CHEAP. If it isn’t light, you won’t carry it; and if it isn’t cheap, you won’t build it in the first place.
Take a First Aid & C-P-R course. Carry the First Aid Kit even if you do not know much first aid. Someone else might know how to use it to your benefit.
Contents
- BENADRYL: In case I get a whole bunch of insect stings, or anytime I suspect anaphylaxis, I would chew up (not swallow whole !!) some Benadryl and ask if anyone has an Epi-Pen handy.
- ASPIRIN: At the first sign of a heart attack, I will chew up ( do not swallow whole !!) several aspirin and take my nitro tabs.
Call 911 ASAP.
Take a First Aid & C-P-R course. - Tube of Cake Icing: Weighs less than an ounce, and is ideal for low-sugar diabetic events or hypoglycemia generally. Can also be used to pump some quick calories into a hypothermic patient.
- ANTI-DIARRHEAL PILLS: Untreated diarrhea leads to dehydration and loss of electrolytes. This will cause loss of physical ability, judgment, and reasoning, and eventually to cardio arrest.
The loss of physical ability and judgment may lead to a swim, or worse. - GATORADE: Replaces fluid and electrolytes. Best if cut 50-50 with water. By the time you are moderately thirsty, you are already in the early stages of Dehydration. Dehydration can lead to hyperthermia or to hypothermia. Both of these conditions lead to loss of judgment and loss of physical performance. During any extended exertion we need to replace lost fluid and electrolytes.
- FOOD: Hypoglycemia leads to poor judgment and loss of physical ability.
- MEDICAIN SWABS: Relieves pain from insect stings and stinging plants. Provides pain relief only. Will not prevent onset of anaphylaxis.
- IBUPROPHIN: Nobody has ever died from sore muscles, except for the times when sore muscles lead to poor paddling, which can lead to a swim, or worse.
- Big Life-Threatening BLEEDS: Apply direct pressure immediately with whatever is at hand. If the bleed is immediately life threatening, and if there is nothing quickly available, and if, like me, you are not too concerned about an exposure to blood borne pathogens when working on a paddling companion, your unprotected hand will work quite well until someone can unpack the first aid kit. Maintain direct pressure for at least five minutes. Check capillary refill and distal neuros.
Place a pressure dressing onto the wound. Use Absorbent Pads, Cravats, Tape, & Vet Wrap Check capillary refill and distal neuros. Send for help. - LARGE—but not life threatening—BLEEDS: Dry the whole area with paper towels, clean the wound and surrounding area with alcohol wipes, place dressing directly against the wound, hold in place with vet-wrap, and then cover with tape. Check cap refill & neuros. Do not tape directly onto or near to the wound. Never wind tape directly onto the patient from the roll. Pull off a length and then apply it. Be sure to check distals prior to and after bandaging or splinting, and every 15 minutes thereafter. Adhesive Bandages, Gauze, Tape, Vet Wrap, Paper Towels, Alcohol Wipes.
Take a First Aid Course. - SMALL Cuts & Scrapes: Who cares.? You ought to keep several sizes of adhesive bandages in your kit, but nobody ever died from skinned knuckles, unless it lead to poor paddling, etc., etc.
Prep the area with paper towels & alcohol wipes before bandaging. - BREAKS & SPRAINS: Check Distals FIRST. Find position of least discomfort — usually the position of use — and then use some combination of splints, Cravats, Elastic Bandages, Tape, Vet Wrap, Absorbent Pads to immobilize the affected limb. Be sure to check distals prior to and after bandaging or splinting, and every 15 minutes thereafter.
Take a First Aid Course. - HYPOTHERMIA: Wrap the patient in a Trauma Blanket and prevent continuing heat loss, use a Mylar Bag or Large Plastic Bags as a vapor barrier and to further insulate the patient. Only if the Patient is CONCIOUS & ALERT: use Heated Liquids to warm the patient from the inside and get some calories into the patient. Also useful: Fire Starter, Matches, Metal Cup, Bivy Sack. Get Professional Help ASAP.
The Hypothermia Bag, if you do it right, doubles as bow flotation. - MISC USEFUL ITEMS: Tweezers, razor blades, Q-tips, splinting material, para-sissors, sewing needles, heavy duty thread, Leatherman Tool, very small flashlight……
You can construct an entire kit that weighs 3 to 4 pounds and should be enough for most scrapes, bleeds, small breaks & sprains, minor dry suit & boat repairs.
Personal rescue gear
Boats
The first piece of gear most ofk us concentrate on is the boat. Make certain the boat is of the right type and fits you well. Boat manufacturers are really getting good with outfitting these days where you can quickly customize the fit and comfort. The old saying, “you wear your boat” still has a great deal of merit. Try to avoid boats that are too large or too small for you as this will frustrate your paddling progression. Here is a great link that describes the basic whitewater kayak types: Whitewater Kayak Types. Other great whitewater craft are canoes (open & decked) and rafts (the best rescue platform).
Most manufactures are overly optimistic on their weight range metrics – they are in the boat selling business. A much better method on choosing boat size is to look at paddlers that have a similar build to yours and see what size boat they are paddling. Most paddlers will even let you try their boats out by swapping for a rapid or two.
When purchasing a river runner or creek boat, look for very sturdy construction. Check the grab handles (or straps) to make certain they are easy to grab when swimming. Verify that you can adjust the seat forward and backward. Sit in the boat and adjust the back band, knee blocks, and bulk head (at your feet). These are all the first steps at custom fitting the boat and making sure everything is in good working order. Check out how your feet fit, are they really squished? Not only is this uncomfortable – it may hinder you getting out of the boat quickly.
Most boats these days are made from roto-molded plastic. Yes – you can custom order fiberglass boats which are really light and fast but that isn’t too common. In my opinion, HTP plastic from Prijon and Eskimo are the strongest and their boats don’t require internal walls to support the deck. Most of the other boat manufactures (Wavesport, Blistic, Dagger, Fluid, Necky, etc.) use a form of linear polyethylene that is repairable via welding. These boats require a center pillar for support in the event of a pin. Jackson Boats use cross-linked polyethylene and are by far the lightest boats in their class. They make great play boats but most paddlers shy away from them for creek boats partly due to design and overall sturdiness. If you are small in size, you really should consider the weight of the boat as well. Most of us portage rapids from time to time and several fun runs have long put-in / take-out walks. What good is a boat you can’t carry safely?
Prices range from roughly $300 (used of course) to $1200. Most new boats are priced around $1000. This is a serious investment that should be protected with flotation (air bags). Air bags cost $30 - $50, cheap insurance in case you swim. Air bags allow your boat to float on the surface enabling much faster recoveries and less damage to your boat.
From a rescue perspective larger volume boats are far more stable, carry more gear, and make boat based rescues a great deal easier. Creekers or river runners are typically the best designs for rescue work. Full on play boats make rescue efforts very challenging.
Paddles
Choosing a paddle these days is a whole lot more complicated than when I started paddling. First off, I need to limit this discussion to whitewater paddles. Sea Kayaking / touring paddles have much different requirements. Paddle lengths are much shorter these days which make sense since boats are a great deal shorter as well. The best resource I have found for determining the best length paddle is on the Werner web site: Werner Paddles Fit Guide.
I tried out the interactive custom fit questionnaire and the results were dead on. I highly recommend using this resource – even if you have been paddling for a number of years. The quiz takes into account many factors such as blade area, shaft diameter, style of boating, and paddler height.
The next consideration is choosing a right hand or left hand control paddle. Nearly everyone goes with the right hand control and I suggest you do the same. Besides making it easier to stack, you can easily borrow other paddles if you break yours.
The next decision is straight shaft or bent shaft. Straight shaft paddles are generally less expensive and give you flexibility in hand placement. Bent shaft paddles force you to position your hands is the perfectly balanced correct position. Many also find bent shaft paddles easier to roll with as well. Some find bent shaft paddles are easier on their wrists as well.
The next decision is feather angle. In the old days, all of our paddles had 90° offsets. Back then we also had long paddles (212 cm was pretty common) and long boats (roughly 14'). Boats are roughly half as long and most paddles are under 200 cm. The preferred feather angle has dropped as well. In general, feather angles are in 15° increments. Generally, river runners with straight shaft paddles tend towards 45° or 30°. When switching to a bent shaft paddle, you will probably want to drop 15° on your feather angle. Play boaters use much shorter paddles and prefer even smaller feather angles. It isn't unusual to see play boaters with a zero degree offset. These are some rough guidelines. I really suggest trying several different feather angles and run some attainment exercises. You will very quickly figure out what is comfortable for you. For more detail on feather angle from a true expert, check out the following article from Jim Snyder: Feather Angle.
The next area to look into is shaft diameter. Women and small-framed men should definitely look into the smaller shaft sizes. This will make a huge difference in avoiding hand fatigue and the very common "Death Grip".
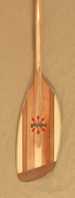 Slasher Design Now we take a look at the blade shape, there are many. Most of the time our paddles enter the water at an angle (instead of perfectly perpendicular). Paddle blades that are cut straight across used to be for slalom (and some down-river) racers. Their paddle entry angle was almost 90° and they wanted maximum power out of each stroke. Typical whitewater forward strokes are more angled so paddle shapes changed to compensate by being longer on the outside than the inside edge. A very common shape is called the Slasher design like this one from Mitchell paddles:
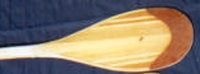 Tear Drop Design Tear drop blade shapes are also very common like this one from Jim Snyder:
There are other shapes as well like Esoteric but most whitewater paddlers choose a blade shape like the ones shown above.
You can also go with a flat blade or a cupped blade. Cupped blades provide a great deal more power than flat blades and I highly recommend them.
Finally, a smaller blade area is easier on the shoulder with the downside of less power per stroke.
The next factor to consider is how heavy and durable is the paddle. This has a lot to do with materials used to construct the paddle and quality of construction. The best paddles are made from wood. Wood is warm, extremely durable, easily customized, reasonably light weight, and can be repaired. Good wood paddles are also the most expensive choice but not as much as you would expect. The next choice is fiberglass or carbon fiber paddles. Many of these are very light and quite strong as well. You get what you pay for, good glass paddles should last between 5 - 10 years - cheap ones a year or two. Plastic paddles are also available. Plastic blades are quite cheap but have an awful amount of blade flex which means serious loss of power. Avoid plastic blades and metal shafts.
Two great paddle brands are Werner: Werner Paddles and Advanced Technology (AT): Advanced Technology. Expect to pay from $250 - $500 for new fiberglass paddles.
There are several great wood paddle makers:
- RainboWave: RainboWave Paddles
- RivrStyx: RivrStyx Paddles
RainboWave starts at $450. RivrStyx start at $578. Both are excellent.
Used paddles are often available starting at $100 (sometimes less).
When you purchase a paddle, definitely put your name and contact information on it. I also recommend wrapping bright colored duct tape in the middle of the shaft on dark colored paddles. Both these practices will help others in reuniting you with your paddle if you swim and lose it.
From a rescue perspective, any good sturdy paddle you are comfortable with will be perfectly adequate for paddle assisted wading.
Safety Whistle
When choosing a safety whistle, you want LOUD and foolproof. If it hurts your ears when blowing it, it sounds just about right. They don't cost much so go with the best. Prices range from $4 - $8. The NRS Storm Whistle is a good choice as is the Fox 40: NRS Whistles.
Throw Rope
Every intermediate boater should carry a throw rope of some sort. In addition, they should take a Swift Water Rescue (SWR) class and learn how to use the rope. The throw rope is a very critical piece of rescue gear. Ropes come in many materials, thickness, and lengths - there is something for everyone. A minimum length should 50'. A real handy length is around 75'. Thickness ranges from 1/4" to 3/8". The smaller diameter ropes are used for waist bag and pocket systems - ropes you wear at all times. Larger diameter ropes are typically stowed securely in your boat. Each has its advantages and disadvantages. Rope systems you wear are always available and you can never predict when one may be needed. Larger ropes are easier to grab by swimmers and can be used for boat extraction. Large ropes weigh more and might not fit in play boats where space is quite tight. It is a good idea to re-tie the knot on both ends to make the loop too small for a hand to fit through. All SWR classes will teach you various methods for throwing the rope at moving targets. This is a skill you need to practice on a regular basis. Rope material may be Nylon, Polypropylene, or Spectra. Nylon is very strong but doesn't float. Polypropylene floats but isn't as strong as the other two fibers. Spectra (Dyneema) is incredibly strong, expensive, and slippery. Spectra ropes have an outer sheath of Polypropolene to help them float and make them easier to handle and hold knots. Treat your rope well and it will last many years. Keep rope clean and try not to step on your ropes as this drives grit inside the rope causing premature wear. Learn how to stuff a bag properly so it flows freely out of the bag when you toss it.
Several vendors sell this piece of gear:
- NRS: NRS Throw Bags
Note: Excellent selection of top quality gear. Many local outfitters resell NRS gear. - Salamander: Salamander Throw Bags
Note: Probably the best waist bag in the market. - Astral: Astral Throw Bags
Note: Made to fit inside the pocket of an Astral PFD.
Prices run $50 - $100 for new ropes.
Rope construction and selection is covered in the Throw Rope section of our course: Throw Ropes.
Knife
When working with ropes, it is always a good idea to carry a rescue knife on your PFD within easy reach. Most PFD's provide a lash mounting tab just for this purpose. If you become entangled in rope, the only quick way to escape is to cut the line. Most of us will want a knife with a blunt tip so we don't accidentally impale ourselves (or others). The knife needs to be sharp and have serrated teeth like a saw. If it is a folding knife, make certain it has a locking feature. I also like a hole in the handle to make it easier to hold. There are several good choices out there from Columbia River Knife & Tool, Gerber, and NRS. Most are around $40 in price. The NRS web site sells all of the major brands: Rescue Knives. The following Zoar Outdoor video also discusses how to select and store a river rescue knife: How to select a Rescue Knife.
Folding Saw
A nice compact folding saw is worth its weight in gold. I have used mine (or my Leatherman saw blade numerous times over the years. A folding saw often makes fast work of removing smaller strainers on the river. It will really save your bacon on a shuttle return via dirt roads after a storm - trust me I know.
Here is an excellent example: Gerber Folding Saw Cost: $12
First Aid Kit
Most paddlers do not carry a first aid kit. If someone is injured, their ability to render first aid is severely limited. On any significant trip, as least one person (preferably more than one so you have some diversity in contents) should have one. Rick Aiken has written two excellent articles on constructing custom first aid kits:
Here is an example of a really minimalist first aid kit by Swimmer: Minimalist First Aid Kit
Here is another version of a First Aid Kit: Alternate First Aid Kit
There are also excellent commercial kits as well. Make certain any kit is stored in a well sealed container or the contents will be ruined by water. I also advise reviewing the contents once a year since drugs do indeed expire. It is also a good idea to take a first aid course and CPR training. Many companies sponsor CPR training for their employees for free. CPR certification via the Red Cross is good for 2 years.
Commercial kits run $35 - $110 and homemade kits are far less expensive. Here is a nice video on kayak first aid kits: Creeking First Aid Kits.
Rescue PFD
Rescue PFD's are a great investment in both personal safety as well as a necessary tool for a number of rescue methods. You should always have a quick release system whenever tied to a line. All rescue vests have a sturdy quick release belt just for this purpose. Rescue vests also provide more flotation than your typical PFD which comes in real handy when swimming in big water like the New River Gorge or the Gauley. Most come with generous pockets where you can store items like a camera, knife, and some will even hold a small throw rope. All have lots of convenient lash straps handy for holding carabineers. Some have a zipper, a real asset when trying to put on over a dry suit. Others do not like Astral. All are very sturdy in construction. When you get one, I highly recommend learning how to thread the quick release buckle so it runs freely when released. Prices have come down a great deal and you can typically pick one up for around $200. NRS carries their own brand, The Astral Green, and Extrasport models: NRS Rescue Vest Brands. Stohlquist also makes an excellent rescue vest for around $200: Stohlquist Rescue Vest. I also like the Kokotat Ronin Pro rescue vest: Kokotat Ronin Pro. If purchasing the Ronin Pro, I highly recommend purchasing the extra back pocket accessory.
Page 6 of 7
- You are here:
-
Home

- Equipment Training Material