Life jackets (PFDs): fit and regulations
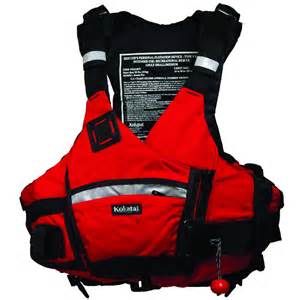 Once you get past the beginner stage, you will be encountering very turbulent water. In addition, many rapids are formed in shallow spots and it is no fun getting banged up by rocks. Whitewater vests help keep you on the river surface and provide some limited protection when banging into rocks. At the same time, good vests shouldn't restrict your mobility. Most paddlers go with some form of Type III PFD specifically designed for whitewater boating.
One of the most important considerations is the right fit. This can be a significant problem for children and small adults. If the PFD is too large, it will ride up on the body and block your vision. In some cases, it may slip off the body during a rescue. Many PFDs come with adjustment straps to ensure a more snug fit - learn how to properly secure your model.
All PFDs must have very sturdy shoulder straps as a common rescue technique is pulling on the shoulder strap. They should be strong enough to lift a couple of hundred pounds in dead weight.
A PFD should be a bright color and ideally have reflective material. Pocket/s are very valuable on a PFD as well. I also recommend tie-downs and small loops for securing items like your safety whistle and river knife. I highly recommend ensuring your PFD is Coast Guard approved - some parks out West require this (like the Grand Canyon for instance).
It doesn't hurt to verify that it still has adequate flotation each year by jumping in the water. If it fails to float you properly (like it did when it was brand new), replace it immediately.
Later on in your paddling hobby, you may wish to upgrade to a rescue vest (after taking the Swift Water Rescue class).
If you have a choice, I highly recommend getting a PFD that has a strong front zipper. These usually have extra fasteners as well. Zippered PFDs are far easier to get in and out of and will not wreck zippers on your dry suit (spoken from personal experience).
There are a number excellent brands of PFDs available such as Astral, Extrasport, Stohlquist, Kokatat, NRS, and Patagonia (Lotus Designs). Prices range from $50 - $210 new.
Paddle: types, parts, length, blade size & shape, fitting, hand position
Choosing a paddle these days is a whole lot more complicated from when I started paddling. First off, I need to limit this discussion to whitewater paddles. Sea Kayaking / touring paddles have much different requirements. Paddle lengths are much shorter these days which makes sense since boats are a great deal shorter as well. The best resource I have found for determining the best length paddle is on the Werner web site: Werner Paddles Fit Guide
I tried out the interactive custom fit questionnaire and the results were dead on. I highly recommend using this resource – even if you have been paddling for a number of years. The quiz takes into account many factors such as blade area, shaft diameter, style of boating, and paddler height.
The next consideration is choosing a right hand or left hand control paddle. Nearly everyone goes with the right hand control and I suggest you do the same. Besides making it easier to stack, you can easily borrow other paddles if you break yours.
The next decision is straight shaft or bent shaft. Straight shaft paddles are generally less expensive and give you flexibility in hand placement. Bent shaft paddles force you to position your hands is the perfectly balanced correct position. Many also find bent shaft paddles easier to roll with as well. Some find bent shaft paddles are easier on their wrists as well.
The next decision is feather angle. In the old days, all of our paddles had 90° offsets. Back then we also had long paddles (212 cm was pretty common) and long boats (roughly 14'). Boats are roughly half as long and most paddles are under 200 cm. The preferred feather angle has dropped as well. In general, feather angles are in 15° increments. Generally, river runners with straight shaft paddles tend towards 45° or 30°. When switching to a bent shaft paddle, you will probably want to drop 15° on your feather angle. Play boaters use much shorter paddles and prefer even smaller feather angles. It isn't unusual to see play boaters with a zero degree offset. These are some rough guidelines. I really suggest trying several different feather angles and run some attainment exercises. You will very quickly figure out what is comfortable for you. For more detail on feather angle from a true expert, check out the following article from Jim Snyder: Feather Angle.
The next area to look into is shaft diameter. Women and small-framed men should definitely look into the smaller shaft sizes. This will make a huge difference in avoiding hand fatigue and the very common "Death Grip".
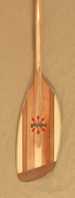 Now we take a look at the blade shape, there are many. Most of the time our paddles enter the water at an angle (instead of perfectly perpendicular). Paddle blades that are cut straight across used to be for slalom (and some down-river) racers. Their paddle entry angle was almost 90o and they wanted maximum power out of each stroke. Typical whitewater forward strokes are more angled so paddle shapes changed to compensate by being longer on the outside than the inside edge. A very common shape is called the Slasher design like this one from Mitchell paddles. Now we take a look at the blade shape, there are many. Most of the time our paddles enter the water at an angle (instead of perfectly perpendicular). Paddle blades that are cut straight across used to be for slalom (and some down-river) racers. Their paddle entry angle was almost 90o and they wanted maximum power out of each stroke. Typical whitewater forward strokes are more angled so paddle shapes changed to compensate by being longer on the outside than the inside edge. A very common shape is called the Slasher design like this one from Mitchell paddles. |
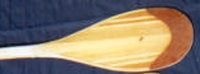 Tear drop blade shapes are also very common like this one from Jim Snyder. Tear drop blade shapes are also very common like this one from Jim Snyder. |
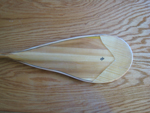 There are other shapes as well like Esoteric but most whitewater paddlers choose a blade shape like the ones shown above. There are other shapes as well like Esoteric but most whitewater paddlers choose a blade shape like the ones shown above. |
You can also go with a flat blade or a cupped blade. Cupped blades provide a great deal more power than flat blades and I highly recommend them.
Finally, a smaller blade area is easier on the shoulder with the downside of less power per stroke.
The next factor to consider is how heavy and durable is the paddle. This has a lot to do with materials used to construct the paddle and quality of construction. The best paddles in so many ways are wood. Wood is warm, extremely durable, easily customized, reasonably light weight, and can be repaired. Good wood paddles are also the most expensive choice but not as much as you would expect. The next choice is fiberglass or carbon fiber paddles. Many of these are very light and quite strong as well. You get what you pay for, good glass paddles should last between 5 - 10 years - cheap ones a year or two. Plastic paddles are also available. Plastic blades are quite cheap but have an awful amount of blade flex which means serious loss of power. Avoid plastic blades and metal shafts.
Two great paddle brands are Werner: Werner Paddles and Advanced Technology (AT). Expect to pay from $250 - $500 for new fiberglass paddles.
There's only one good wood paddle maker left these days: RivrStyx Paddles. PA Jimi Stick as the are affectionally know as will cost $650 but is a lifetime investment.
Used paddles are often available starting at $100 (sometimes less).
When you purchase a paddle, definitely put your name and contact information on it. I also recommend wrapping bright colored duct tape in the middle of the shaft on dark colored paddles. Both these practices will help others in reuniting you with your paddle if you swim and lose your paddle.
Outfitting Boats
Introduction
Manufacturers are making much better boats these days, especially in the area of outfitting. The old saying, you wear your boat is still quite true - even more so for Play Boats. When outfitting boats, always make certain you can quickly escape. Each boat has it's particular quirks for adjustments and outfitting. If you have a Jackson Kayak, I highly recommend stopping by the Valley Mill store in Germantown: Valley Mill Boats. They really stand behind Jackson Kayaks and will take the time to help you get outfitted the right way. Potomac Paddlesports has scheduled outfitting days at their shop in the past and probably will continue to do so. All you need to do is buy the foam, not a bad deal.
Why Outfit / Customize?
This is a really good question. Many boats like my Prijon Creeker 225 are pretty much ready to use. This boat comes with a special torque wrench that fits all of the boat screws. You will of course need to adjust the foot bulk head to the correct length. Hip pads also need to be adjusted for a snug but comfortable fit. Finally, adjust the back brace via the cam straps and you are ready to go. We generally customize boats to make them fit our bodies, add safety features, and make them more comfortable.
Keys Areas To Adjust
Many of us have seen power boats that bounce up and down under speed. This wastes a great deal of energy and makes the boat hard to control. We have a similar issue on kayaks. If the boat is too heavy in the rear, we will back-ender when passing through holes or paddling large waves. If the boat is too heavy up front, the boat becomes much harder to steer. Ideally, we want our boat to sit perfectly flat on the water. The heaviest item in our boat is the paddler. We need to adjust that dead weight forward or backward until the boat is trimmed. We do this by moving the seat. Each manufacturer has their own seat adjustment mechanisms so look for instructions at the boat sellers web site.
To be an efficient paddler, you need a boat that fits snugly. When taking a forward stroke, you press down with the same side foot against the bulkhead. If you can't reach the bulk head, you will be using your arms and not your strong abdomen muscles for propulsion and have a very weak stroke indeed. Better adjust the foot bulk head so you can press down on it. You will also need the bulk head to push off of when trying to leave the boat quickly. Some boats lack a bulk head like play boats. On these boats, you will need to add mini-cell foam and carve foot rests to provide the same capability.
OK, we have the bulk head set correctly and my knees are in a comfortable position. You still need something to stop you from going too far back in your boat, that is where the back band comes into play. The back band should rest in the small of your back. Once adjusted properly, all the energy from your torso is applied to the boat.
Now let's take a look at bracing and sweep strokes. Your boat is leaning on its side and you want to either hold that position or get the boat back upright. How are you going to accomplish this task? You need to do this with your hips. This is where snug (but not to tight) hips pads help you to control the boat.
The final area is adjusting the knee braces and padding where your knees and thighs rest against the boat deck. Most knee braces have a couple of simple screws or bolts with a series of holes so you can move them forward or backward to a comfortable position.
Supplies
The first step is to check out your boat vendor's web site. Often, these sites will have a number of suggestions. I would also contact the place where you purchased the boat. If they have carried boats from that vendor for awhile, I am certain they have learned a trick or two. Local outfitters are probably your next best stop for supplies. You will need a good screwdriver - Phillips and standard. Oddball heads like those used on Prijon boats have special tools that come with the boat. A really good adhesive I have used over the years is Weldwood Oil Based Contact cement.
Some Additional Resources
Kayak: Types and Parts
Introduction
Acquiring whitewater equipment can be a somewhat daunting task these days. The sport has evolved to the point where there are many sub-specialties like park & play, river running, creeking, etc. I swear that many equipment hounds treat kayaks like they were golf clubs. Unfortunately, boats and other gear can be a bit pricy so we don’t want to make a major purchasing mistake. I strongly recommend demoing boats and paddles before purchasing. They should be demoed on the types of runs you expect to paddle the most. Beginning kayakers probably should stick with used gear. This will save a great deal of money and make it less costly to trade up if you find something more suitable to your paddling style.
Boat Types
The first piece of gear most of us concentrate on is the boat. Make certain the boat is of the right type and fits you well. Boat manufacturers are really getting good with outfitting these days where you can quickly customize the fit and comfort. The old saying, “you wear your boat” still has a great deal of merit. Try to avoid boats that are too large or too small for you as this will frustrate your paddling progression. Here is a great link that describes the basic whitewater boat types: Whitewater Boat Types.
Make sure the boat fits
Most manufactures are overly optimistic on their weight range metrics – they are in the boat selling business. A much better method on choosing boat size is to look at paddlers that have a similar build to yours and see what size boat they are paddling. Most paddlers will even let you try their boats out by swapping for a rapid or two.
When purchasing a river runner or creek boat, look for very sturdy construction. Check the grab handles (or straps) to make certain they are easy to grab when swimming. Verify that you can adjust the seat forward and backward. Sit in the boat and adjust the back band, knee blocks, and bulk head (at your feet). These are all the first steps at custom fitting the boat and making sure everything is in good working order. Check out how your feet fit, are they really squished? Not only is this uncomfortable – it may hinder you getting out of the boat quickly.
Boat Construction
Most boats these days are made from plastic. Yes – you can custom order fiberglass boats which are really light and fast but that isn’t too common. In my opinion, HTP plastic from Prijon and Eskimo are the strongest and their boats don’t require internal walls to support the deck. Most of the other boat manufactures (Wavesport, Blistic, Dagger, Fluid, Necky, etc.) use a form of linear polyethylene that is repairable via welding. These boats require a center pillar for support in the event of a pin. Jackson Boats use cross-linked polyethylene and are by far the lightest boats in their class. They make great play boats but most paddlers shy away from them for creek boats partly due to design and overall sturdiness. If you are small in size, you really should consider the weight of the boat as well. Most of us portage rapids from time to time and several fun runs have long put-in / take-out walks. What good is a boat you can’t carry safely?
Flotation
Water is heavy. A gallon of water weighs 8 pounds. An average kayak weighs 50 pounds and holds about 70 gallons of water. If you end up swimming and the boat fills with water, you will need to manage about 600 pounds of dead weight - better eat your Wheaties. Since we are running rapids, forces on that boat will be significantly higher for someone trying to rescue your boat and get it to shore somehow. A much better approach is displacing that heavy water with really light air. This is done with flotation. On my trips, I insist all participants have air bags at least in the rear of their boat and many other trip leaders do the same. Some boats like Sea Kayaks have built-in floatation in the form of bulkheads that accomplish the same purpose. Most whitewater kayaks do not. Air bags will also prevent extensive damage to your boat in the event it becomes pinned; they are really cheap insurance and cost between $30 - $50 new.
Kayak Parts
Kayaks look pretty simple but there is more to them than meets the eye. Most of us see the outer shell. The shell has a top and bottom called the deck and hull respectively. The hull is more critical since this is the portion of boat in the water and greatly affects how your boat will move through the water. We talked about boat types in a section above. Play boats have a flat or planning hull. They are typically wider than most kayaks and have very sharp well-defined edges. These design features make it easier to carve turns, surf waves, and initiate aerial moves. They can be more difficult to roll back up once flipped and tend to flip easier in whitewater. Creek boats are just the opposite. They usually have very rounded hulls without those pesky edges (AKA: chine's). If you compare a creek boat to a play boat and look at them from end to end, you will notice creek boats have a lot of curve from front to back - this is called rocker. A large amount of rocker enables the boat to surface quickly after becoming submerged. Many novices find creek boats and river runners easier to paddle.
Now let's take a closer look at the deck. In the middle you have the cockpit. The cockpit is where you get in the boat and is a very important safety feature. In the old days, we had small standard cockpits. Over the years, many discovered that small cockpits are hard to get out of if the boat gets pinned - OUCH! These days, cockpits are quite generous in size and most paddlers can easily move their knees to the center open area for easy escape. Most (but not all unfortunately) also have some sort of grab loop at the end of the boats. This makes it easy to secure on a car and more important, easier to safely grab while swimming with your hand. Most river runners and creek boats also have pin bars that are close to the cockpit, often in front and behind. These pin bars are very sturdy in construction and the ideal place to attach a carabineer for freeing the boat if it becomes entrapped. It is a really good idea to check these attachments periodically to ensure they stay tight. At the very back of the boat there is typically a drain plug - another really important feature. The drain plug makes it much easier to empty your boat when full of water. I suggest carrying a spare plug or a cork in your dry bag in case you lose the plug. Always check yours and your paddling buddies boats to see if their drain plug is attached after each break.
Now let's look inside the boat. The first thing you will notice is the seat. The seat should be comfortable to sit in for long periods. Behind the seat is the back strap. The back strap should be easy to adjust and needs to rest in the small of your back for adequate support. Don't skimp on the back strap as it is really important for comfort and control of your boat. Back straps can be tightened with ratcheting mechanisms or simple draw strings. On the sides of your seat are hip pads. You will need to add/subtract foam to get a snug fit. Don't make these too tight or you will cut-off circulation to your feet. Most kayaks have a way to move the seat forward of backward. You need to adjust your trim to make certain the boat sits in the water balanced from front to back. Each boat manufacturer has different ways to make that adjustment, consult your owner's manual, web sites, or boat seller.
Now lets venture a bit further into the boat. Your knees need to exert pressure on the underside of the deck. This area needs some padding to make that comfortable. Next to your knees, there should be knee blocks or thigh braces to hold your legs in the optimal position. Between your legs there should be stiff pillars made of some type of foam. This foam wall supports the deck and prevents it from caving in under pressure. Nearly all boats require this safety feature except for Prijon and Eskimo boats which have very rigid plastic. Walls are typically in both the front and back of the boat. Looking a bit further inside the boat you will notice a bulk head or foot braces. I strongly prefer a full size bulk head that is impossible to get my feet around. Most play boats skip this feature and you need to add mini-cell foam blocks to accomplish the same task. Take time in adjusting the bulk head so you are snug in the boat. This makes controlling the boat much easier.
Far less critical but useful are water bottle holders. These can be attached on the floor, center pillar, or hung off the deck inside. Some boats have an attachment for a throw bag which is real handy. Larger whitewater boats like the Fluid Solo have a watertight bulkhead which adds flotation and makes it easier to store gear.
For more information, check out the following article on outfitting boats: Outfitting Boats.
Here is a nice video covering the kayak parts for a touring or sea kayak: Parts of a Touring Kayak.
How much is this going to cost?
Prices range from roughly $300 (used of course) to $1200. Most new boats are priced around $1000. This is a serious investment that should be protected with flotation (air bags). Air bags cost $30 - $50, cheap insurance in case you swim. Air bags allow your boat to float on the surface enabling much faster recoveries and less damage to your boat.
Page 3 of 7
- You are here:
-
Home

- Equipment Training Material